But first, I will share my little tip for getting inspired...maybe you already do it, but here goes...
I google either the name of the stamp set or the name of the dies I am using and go to the pictures tab (in Google). I get loads of ideas and go from there...sometimes I just add my little twist...I do my best to give credit where credit is do and link to them when I can remember where I got the inspiration from!
So for this card I got inspired from a picture I saw, so I looked it up and it's from Rosalie Crich, I can't seem to find her blog...but the picture was on Tracie St-Louis blog and you can see it here.
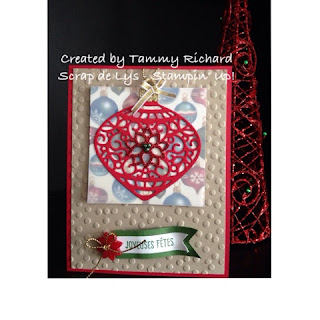
I just LOVE the Delicate Ornament Thinlits Dies. Specially the one in the card below, with all it's details. In the set, you can also find the Poinsettia piece and layer it in a different paper to make it stand out! I cut the ornament in Real Red and used the Red Glimmer Paper to make the Poinsettia POP!
I made the card two weeks ago, but didn't post it as I was saving it for my customers and class attendees to have it as a kit to go card and make it at home! My little token of appreciation for the encouragement and attendance! And early x-mas gift!
You can see that I added pearls in the center of the Poinsettia. I colored them with my Mossy Meadow marker, I do it a couples of times and let it dry in between each time. You can also use clear embossing powder to set the ink in. But I also found the coloring them a couple times works too. I also LOVE the use of Vellum paper, I layered it over the Home for Christmas DSP (Designer Series Paper).
So each customer got this kit. Now for the instructions...
- base card cut 4 1/4'' x 8 1/2'', scored at 5 1/2'' in Real Red cardstock
- layer cut 4'' x 5 1/4'' embossed with Decorative Dots folder in Crumb cake cardstock
- ornament layer:
- DSP 3'' x 3''
- Vellum paper 3'' x 3'' (adhesive doesn't show, I put glue dots where the ornament is
- Ornament cut in Real Red cardstock
- Poinsettia cut in Red Glimmer Paper (it fits perfectly, you just have to find the right angle)
- Ornament string holder cut in Gold Glimmer Paper
- a 3'' piece of Gold Cording Trim
- sentiment:
- base cut 2 1/4'' x 3/4'' in Mossy Meadow cardstock
- sentiment layer cut 2'' x 1/4" in Whisper White cardstock
- Home for Christmas Designer Button - Poinsettia, or can also use the round stripped one too.
I hope you enjoyed today's card, I would love your feedback. Remember to suscribe to my blog and don't miss a post, get them via e-mail.
Cheers, God Bless and Happy Stampin'
Pour mes clientes francophones,
J'espère vous avez aimer mon petit cadeau! Merci pour votre présence et encouragement! Voici les instructions, et la liste des items utilisés. Désolé, avec ma mémoire qui fait des ''free games'' depuis ma chimio, j'ai de la misère. Je pensais je l'avait publier sur mon blog, mais en cherchant, je me suis souvenu que non, car je la gardais en surprise pour le soir de la classe. Désolé de ce mal entendu.
Toutes les couleurs utilisés pour tampon encreur; papier cartonné; ruban et ornement (bouton, etc):
- Feuillage sauvage
- Murmure blanc
- Rouge rouge
- Brune Dune
- Or
- carte de base 4 1/4'' x 8 1/2'', marquée a 5 1/2''
- étage sur base, 4'' x 5 1/4'' embosser avec plioirs Pois décoratifs
- étage de l'ornement:
- DSP 3'' x 3''
- Papier Vélin Blanc 3'' x 3'' (la colle parait, alors je met des mini point de colle en dessous de l'ornement
- Ornement avec détails et Poinsettia
- Poinsettia coupé avec le papier a paillette Rouge (il fait parfaitement, il faut juste trouver le bon angle)
- support pour ornement
- la cordelette d'environ 3''
- sentiment:
- base 2 1/4'' x 3/4''
- étage sur base 2'' x 1/4"
- Papier de la série Design Marché de Noel
- bouton Poinsettia, ou comme vous avez eu dans le kit, le rond avec rayure
- cordelette d'environ 5'' pour boucle
Merci infiniment!
Tammy


No comments:
Post a Comment